Many households rely on refrigerators for storing perishable items. It’s a problem when the KitchenAid refrigerator suddenly stops cooling. There could be various reasons why this happens, but most issues can be fixed quickly and easily.
We will discuss these causes and offer practical solutions to restore your refrigerator’s optimal performance, including maintaining the correct refrigerator temperature, in this blog post.

KitchenAid Refrigerator Not Cooling
When a KitchenAid refrigerator suddenly stops cooling, it can signal one or more underlying issues. These may include dirty condenser coils, malfunctioning evaporators, faulty evaporator fans, problems with the compressor relay, or defective condenser fans. It could also be attributed to incorrect temperature control settings, faulty gasket seals, or clogged defrost drains. While some of these problems can be resolved with a trusty screwdriver, others may require the expertise of a professional.
Before reaching for that screwdriver, let’s cover all our bases to ensure the solution isn’t an obvious one. From there, we’ll systematically work through the potential fixes.
Double Check KitchenAid Refrigerator Power Outlet
- Checking the Outlet: Sometimes, a broken outlet can make your fridge not cool properly. So, we’re going to see if it’s causing the problem. First, unplug your fridge from the wall.
- Testing with Another Device: Now, plug in something else like a phone charger or a lamp. If that doesn’t work right, the outlet might be the issue.
- If the Outlet Works: If the new device works fine, then the outlet is good. Next, try giving your fridge a little break. Leave it unplugged for about two minutes, then plug it back in. This can often fix the problem.
- Keep Some Space: Fridges need space to breathe. Make sure there’s at least one inch of space between the back of your fridge and the wall. This helps it cool down properly.
Ensure That KitchenAid Refrigerator and Freezer Doors Close Properly
- Check the Rubber Seals: Look at the rubber seals around the doors of your fridge. They’re important because they help keep the door closed tightly. This way, cold air stays inside and warm air stays out.
- Damaged Seals Cause Problems: If these rubber seals get damaged, your fridge will have a hard time staying cool.
- Inspect the Doors: When you’re checking your KitchenAid fridge, make sure the doors close properly and seal tightly.
- Fixing Loose Seals: If you see a seal that’s a bit loose, gently push it back into place.
- Replacing Damaged Seals: If you notice the seals are clearly broken or damaged, you might need to get new ones.
- Make Sure the Doors Close Well: After you’ve checked the seals, close the doors and make sure they seal tightly. If there are big items blocking the doors, remove them so the doors can close properly.
Reset Temperature Controls

Temperature Settings Matter: The settings that control how cold your fridge is are really important. If you change them, it will affect how well your fridge works.
The Right Temperature: It’s best to keep your fridge between 33°F and 40°F. If it’s any warmer, your fridge, freezer, and ice maker might not work properly.
Adjusting the Temperature: If you find the temperature is too high, you can fix it. Just lower the settings for both the fridge and the freezer. Remember, they might have separate controls, so check both.
Checking Over Time: As time goes on, it’s a good idea to make sure the temperature is still right. Sometimes, fridges can start to get warmer or cooler. To check, you can put a special thermometer inside your fridge for a week. If the reading is too high or too low, adjust the temperature settings.
Clean the Condenser Coils
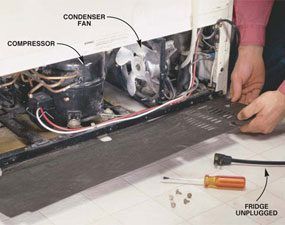
- Turn Off and Move Fridge: First things first, unplug your fridge from the wall. Then, gently pull it away from the wall so you can get to the back.
- Find the Coils: At the back of your fridge, there are some special tubes called condenser coils. They help keep your fridge cool. Sometimes, depending on your KitchenAid model, you might find them in the front too.
- Why They Get Dirty: These coils do a lot of work, and they can get dirty over time. Dust, dirt, and even pet hair can build up on them.
- How to Clean Them: Take off the cover at the back of your fridge (it’s called a vent or grille). Clean it up because it can also get dusty. Then, look for the coils. If they’re dirty, it’s time for a clean-up.
- Tools You’ll Need: Get a special vacuum attachment that’s narrow, like a hose. Use it to gently vacuum the coils. If there are hard-to-reach spots, you can use a special brush made for this job.
- Be Thorough: Make sure all the dirt is gone. Vacuum up any bits that are left. We want it squeaky clean!
- Put It Back Together: Once you’re done, put the grille back on and plug your fridge back in.
This should help your fridge work better! If you need to, you can do this again in the future. Just remember to unplug it first.

Make Sure the Condenser Fan Is Working Properly

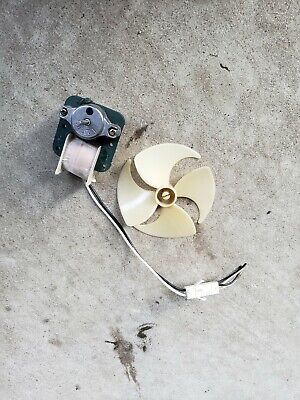
Condenser Fan’s Job: Your fridge has a fan that’s pretty easy to spot. It’s usually found between some important parts called the condenser coils and the compressor. What it does is simple: it keeps those parts cool by blowing fresh air over them.
What Happens If It’s Not Okay: If this fan stops working or gets blocked, your whole fridge can have problems, and it won’t cool properly.
When It Should Start: When you turn on your fridge, this fan should start spinning by itself, and it keeps spinning as long as the fridge is on.
Checking for Issues: If the fan doesn’t start spinning when you turn on your fridge, there might be a problem. First, take a look at the fan’s blades to see if there’s anything blocking them. If they look clear but still won’t spin, try giving them a gentle push to get them going.
If It Still Doesn’t Work: If none of that works, it’s possible that the fan’s motor isn’t working properly, and you might need to replace it. Also, if the fan blades look rusty or worn out, you might need to get new ones.
So, in simple terms, make sure the fan is spinning and doesn’t have any issues. If it’s not working right, you might need to replace some parts. This helps keep your fridge running cool!
Examine the Start Relay
Check the Start Relay: After making sure the fan is working, the next thing to look at is the start relay. It’s a part near the fan, connected to the big machine called the compressor. It’s in charge of turning on the compressor.
What It Does: Think of it like a switch for the compressor. If it doesn’t work, the compressor won’t turn on, and your fridge won’t cool properly.
How to Check It: Turn on your fridge and touch the compressor. If it’s working right, you’ll feel it moving or hear a buzzing noise. If there’s no movement or buzzing, the start relay might be the problem.
Checking the Start Relay: Unplug your fridge and carefully take out the start relay. Give it a little shake. If you hear rattling or see bits falling out, it means the relay is broken and you’ll need a new one.
Listening for a Click: Another way to check is by listening. When you turn on your fridge, if you hear a click from the compressor followed by another click turning it off, it means the start relay is likely the issue.
So, in simple words, if the compressor isn’t starting up, the start relay might be the culprit. You can listen for a click or check by touching the compressor. If it’s not working right, you might need to replace the start relay. This helps your fridge cool properly!
Verify that the Evaporator Fan Is Working

Check the Evaporator Fan: This is a fan that helps keep your fridge cool. It’s in the front part of your fridge.
What It Does: The fan pulls in cold air and spreads it around your fridge. It first cools the freezer and then the main part where you keep your food. If this fan isn’t working right, the cool air won’t spread properly.
How to Tell If It’s Not Working: If your freezer is cold enough but the main part of the fridge isn’t, it might mean this fan needs to be replaced.
One or Two Fans: Some KitchenAid fridges have one fan, and others have two. The newer ones usually have two – one in the freezer and one in the main part. The older ones usually just have one in the freezer.
How to Check: Just listen. If it’s working, you should be able to hear it.
In simple terms, if you think the fan in the front of your fridge isn’t working, you might need to get it replaced. You can tell by listening if it’s running properly. This helps your fridge stay nice and cool!
For Refrigerators with a Single Evaporator
- Accessing the Evaporator Fan: To get to the evaporator fan in older KitchenAid fridges, you need to take off the light fixtures and look up inside the fridge.
- Checking the Fan: If you need to touch or see the fan directly, you might have to take out the whole system. The good news is, you don’t need to be a tech expert for this.
- Testing the Fan: If the fan isn’t spinning, it might be broken or stuck. You can do a simple test using the door switch. This switch controls when the fan turns on and off, as well as the fridge lights.
- Testing with the Door: When you close the fridge doors, it should automatically turn on the fan. Or you can pretend to close the doors by pressing the door switch. If the fan is working properly, it should start spinning after a few seconds.
For Refrigerators with Dual Evaporators
- Dual Evaporators: Some newer KitchenAid fridges have two cooling systems. We’re looking at the fridge’s evaporator fan now.
- Accessing the Fan: Carefully separate the panels in the fridge and freezer to see the evaporator fan. They should stay connected. This will show the fan.
- Checking the Fan: Close the fridge doors. After a couple of minutes, quickly open them again. You should see the fan still spinning before it stops.
- If the Fan Doesn’t Spin: If you’ve tried this a few times and the fan isn’t moving, it’s likely that the fan is broken.
So, whether you have one or two cooling systems, if the fan isn’t working, you might need to replace it. You can test it by using the door switch. It’s essential for keeping your fridge cool.
Examine the Evaporator(s)
If previous solutions and checks are done and the fridge is still not working, focus on the evaporator. It’s a set of tubes behind the freezer panel that produces cold air. Newer models have dual evaporators for better control. If the fridge is warm but the freezer is cold, a faulty evaporator fan motor might be the issue. Also, ensure the temperature control thermostat is functioning.
Use a multimeter to check the compressor. If it fails, consider replacement. If it passes, consider replacing the main control board.

For Refrigerators with a Single Evaporator
For Fridges with One Cooling System:
- Unplug your fridge from the wall.
- Open the freezer safely.
Inside the Freezer:
- Take out all the shelves.
- Unscrew the panel at the back to reach the cooling coils.
Inspect the Coils:
- Look for ice on the coils or panel. It could signal a problem with the defrost thermostat at the top of the coils.
Checking the Thermostat:
- Check the thermostat’s lid. If it looks swollen, think about getting a new one.
Testing the Thermostat:
- If it looks okay, you can test it with a special tool to see if it’s working right.
Important Note:
- This process needs advanced knowledge. It’s better to get a professional’s help.
Looking at the Defrost Heater:
- This part melts ice on the coils. It’s usually below the coils and turns on every few hours.
Checking the Heater:
- You might have to take it out to test it. You’ll need a special tool called a multimeter.
Testing the Heater:
- A good heater should give a reading between 20 to 40 Ohms on the multimeter.
Remember, if this feels too tricky, it’s best to ask a pro for help. They know what to do!
For Refrigerators with Dual Evaporators
For Fridges with Two Cooling Systems:
- Unplug the fridge from the wall and open the fridge doors.
Inside the Fridge:
- Take out all the food, shelves, and drawers.
- Unscrew the panel at the back.
Finding the Coils:
- You’ll see the cooling coils once the panel is off.
Checking the Defrost Heater:
- Underneath the coils, you’ll find the defrost heater. Its job is to stop the coils from icing up. It does this by turning on every few hours to melt any ice.
If There’s Too Much Ice:
- If you see a lot of ice on the coils or panel, leave it for a bit. Sometimes, when the fridge door is open too long, moisture from the air can turn into ice.
Plug it Back In:
- After a few minutes, plug the fridge back in and let it run. Then, see if it’s working properly.
If it Still Doesn’t Work:
- If it’s still not working, you might need to think about replacing either the defrost heater or the evaporator fan.
Remember, if this feels too tricky, a professional can help sort it out. They know what to do!
Inspect the Defrost Drain
Why it’s Important: Your fridge has many parts that work together. If one part has a problem, it can affect the others. In your fridge, there are coils that make things cold, and a heater that stops ice from building up on them.
What Happens When it Defrosts: Sometimes, the heater melts ice and it turns into water. Normally, this water goes into a special drain in your fridge.
When the Drain Gets Blocked: But sometimes, this drain can get blocked. This happens when things like dirt or bits of food get in the way. When this happens, the heater can’t melt all the ice, and it builds up.
What Extra Ice Means: Too much ice can make your fridge not work right. It won’t be as cold as it should be.
How to Fix it:
- Unplug the Fridge: First, unplug your fridge and let it sit for a bit to thaw out.
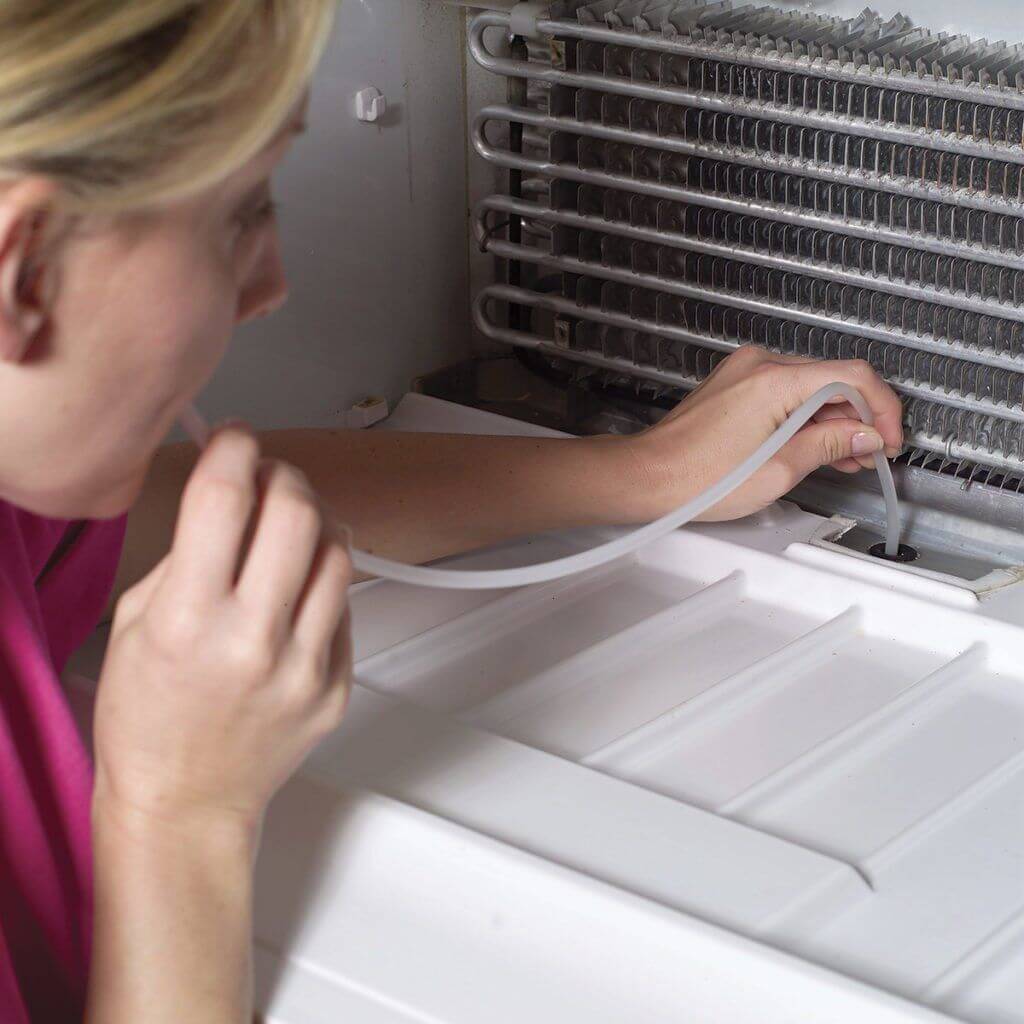
- Clear the Drain: Then, use a tool to blow air into the drain. This will clear away anything that’s blocking it.
So, if your fridge isn’t cooling properly, a blocked drain might be the reason. You can fix it by clearing the drain. If you’re not sure how to do it, it’s best to ask a professional for help. They’ll know what to do safely.
For Refrigerators with a Single Evaporator
In traditional KitchenAid refrigerators equipped with a single evaporator, the defrost drain is located in the freezer, beneath the evaporator coils.
For Refrigerators with Dual Evaporators
In dual evaporator refrigerators, the defrost drain can be found in the refrigerator section, directly under the evaporator coils.
When You Need to Order Replacement Parts for KitchenAid Refrigerator
If you suspect a faulty part, it must be replaced quickly.
You can purchase a replacement for your KitchenAid fridge by finding the model number and entering it in Sears Parts Direct.
The sticker with the necessary details is located inside the refrigerator on the side wall.
KitchenAid Refrigerator User Manual
If your refrigerator is not cooling, you need to check the user manual for troubleshooting tips. If you can’t find the manual, visit kitchenaid.com and enter your fridge’s model number in the search bar. You may then download an electronic version of the manual.
KitchenAid Customer Support
If your KitchenAid refrigerator, dishwasher, or dryer still isn’t cooling after you’ve tried everything, it’s time to get help. Call 1-800-422-1230 on weekdays from 8 AM to 6 PM EST for expert assistance with your major appliances. You can also book an appointment online if you need a certified technician to examine it at home. If you have a warranty, the cost of the service might be fully covered.
FAQs
How to run a diagnostic on KitchenAid refrigerator?
Press the control POWER button and the water filter RESET button together for three seconds to activate the diagnostics mode.
What are the symptoms of a faulty thermistor?
A thermistor that is malfunctioning will show inaccurate temperatures or impossibly large temperature changes. For instance, the temperature might read 210 degrees at first, then decrease to 189 degrees before rising once more.
How do I turn on the cooling on my KitchenAid refrigerator?
On the display screen, “COOLING OFF” will appear when cooling is turned off. To restart cooling, press and hold LOCK and MEASURED FILL for 3 more seconds.
Conclusion
KitchenAid refrigerators might suddenly stop cooling, leaving you confused. This issue usually arises from a dirty condenser coil, malfunctioning evaporators, a faulty start relay, or a defective evaporator fan.
Luckily, these problems are simple to fix. We’ve provided easy-to-follow steps in this guide that will assist you in identifying the exact problem and resolving it quickly. If professional help is necessary, we have also included information on where you can get it.
Jeegna
Greetings, tech enthusiasts! I'm Jeegna, your go-to guru for all things gadget-related. With a passion for technology that runs deep, I've made it my mission to unravel the mysteries of the digital world and simplify it for you.Related Posts
- Samsung Dishwasher Not Draining
- Bosch Refrigerator Not Cooling
- Hisense Refrigerator Not Cooling: Troubleshooting Guide
- Frigidaire Refrigerator Not Cooling
- Maytag Refrigerator Not Cooling
- Samsung Refrigerator Not Cooling
- LG Refrigerator Not Cooling
- GE Refrigerator Not Cooling
- Amana Refrigerator Not Cooling
- Kennore Refrigerator Not Cooling
- Insignia TV Volume Stuck
- TCL TV Volume Stuck (Easy Fix Steps)
- Sony TV No Sound (Don’t Miss a Beat)
- Apple TV Volume Stuck (Troubleshooting Guide)
- LG TV Volume Stuck (Quick & Easy Fix)
- Samsung TV Volume Stuck (This Quick Trick Could Save Your Day!)
